Ergonomic Desk Setup
What Ergonomic Desk Setup Means
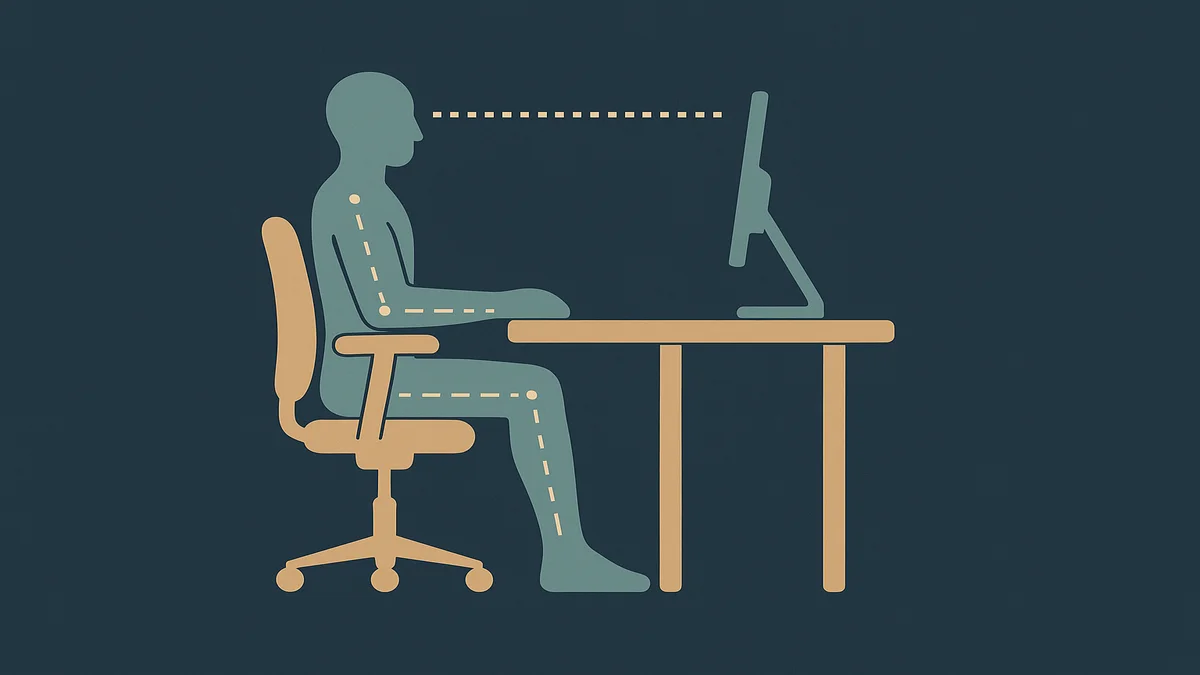
An ergonomic desk setup is a workspace arranged so your body sits in a neutral, supported position while you work: screen at eye level, elbows at roughly 90 degrees, feet flat, wrists straight, and your lower back actually supported. The point is to remove the small daily strain that adds up into aches, numbness, and eventually injury.

I’ve worked fully remote for over a decade, and I’ve come to think of ergonomics less as a product category and more as a decision framework. You are deciding, piece by piece, whether each part of your workspace is fighting your body or working with it. The good news is that most of the answer is geometry and habit, not shopping.
Why It Matters for Remote Work
Office workers inherit someone else’s ergonomic decisions: facilities chooses the chair, IT decides the monitor stand, the desk comes pre-attached to the building. Remote workers inherit nothing. When I moved home, my “office” was a dining chair and a laptop balanced on a coffee table, and within a few months my shoulders were on strike. That’s the default, not the exception.
The problem with working from home is that your body is the only witness. In an office, someone eventually notices you’re hunched over; at home, the laptop is right there and the couch is comfortable, so bad positioning quietly becomes normal. A laptop screen is typically 10 to 12 inches below a seated eye level that already matches most desk setups poorly, which is why the classic remote-worker posture is a fixed downward stare with a rounded upper back.
There’s a second reason this matters more at home: duration. Commuting, walking to meeting rooms, and going out for lunch all break up sitting time. When your commute is twelve seconds, a two-hour block of immobility can go by without you noticing. That’s a workload issue, not just a posture one.
The payoff of fixing it is not abstract. A neutral setup means you end the day with energy left over, you’re less distracted by discomfort, and you dramatically lower the odds of the kind of repetitive strain that takes months to recover from. It’s one of the highest-return investments a remote worker can make, because it compounds daily.
How It Works
Ergonomics works by aligning the workspace to the body’s neutral positions, so that joints sit at or near the middle of their range while you work. OSHA’s computer workstation guidance describes the same neutral targets I use: forearms, wrists, and hands straight and roughly parallel to the floor, head level and balanced, shoulders relaxed, and the screen at a viewing distance of about 20 to 40 inches (50 to 100 cm) from your eyes. Break the setup into its components and each alignment is simple.
Chair and seat height
Start here, because everything else is measured from it. Sit with your feet flat on the floor (or a footrest), thighs roughly parallel to the ground, and hips at or slightly above knee level. Your lower back should contact the backrest, not hover in front of it. If the chair is too low your knees ride up; too high and your feet dangle, which pushes pressure into the backs of your thighs. Adjust seat height before you adjust anything else.
Desk height and elbow angle
With your seat set, put your hands on the keyboard. Your elbows should bend at roughly 90 degrees with your forearms parallel to the floor and your shoulders relaxed. If you have to shrug to reach the keys, the desk is too high; if you slump forward, it’s too low. Fixed desks are built around average bodies, which is exactly why so many of us don’t match them, and why a seat-height-first approach matters.
Monitor position
Raise the screen so the top of the display sits at or slightly below eye level, and set it at arm’s length — that 20-to-40-inch viewing distance OSHA recommends. If you use a laptop as your main screen, you are almost certainly breaking both rules at once, which is why a laptop stand or riser (with a separate keyboard and mouse) is the single most common first fix in remote ergonomics. Laptops are fine as portable computers; they’re terrible as workstations.
Keyboard, mouse, and wrists
Keep your wrists straight — not bent up, down, or to either side — while typing, with the mouse close to the keyboard so you aren’t reaching for it all day. A mouse that’s the wrong size or shape for your hand forces micro-adjustments thousands of times a day. I covered the options and what to look for in the best mouse for work guide; the short version is that fit and grip style matter more than features.
Lighting, glare, and screen placement
OSHA’s workstation-environment guidance recommends controlling glare with blinds or drapes on windows and using indirect, even lighting rather than intense or uneven light in your field of view. Practically: put your monitor perpendicular to windows rather than facing or backing them, and don’t work with a bright window directly behind the screen. Glare doesn’t just cause eye strain — it makes you lean and tilt into weird positions to see around it.
Movement and breaks
Ergonomics isn’t only static positioning. OSHA’s work-process guidance suggests building in short micro-pauses — roughly a five-minute break every hour — because no posture, however perfect, survives hours of stillness without a cost. I treat my watch’s stand reminder as a feature, not an annoyance. Movement is what lets a mediocre setup stay tolerable; a good setup plus movement is what keeps it good.
If you’re starting from scratch, our home office guide walks through the room-level decisions — location, desk size, storage, and lighting — that sit one layer above the ergonomics covered here.
Practical Steps and Examples
A full teardown isn’t necessary. Here’s the order I’d actually do things in, based on what has made the biggest difference for me and the remote workers I’ve talked shop with over the years.
- Fix your seat height first. Feet flat, thighs parallel, sit all the way back into the chair.
- Raise your screen to eye level. A riser or a stack of books costs nothing; a monitor arm is the tidy permanent version.
- Bring the keyboard and mouse to you. Elbows at 90 degrees, wrists straight, mouse within easy reach.
- Kill the glare. Move the desk relative to the window before you buy anything.
- Set a movement timer. Every hour, five minutes of standing or walking.
- Then, and only then, shop. Replace only the pieces that failed steps 1–5.
The kitchen-table worker
You work on a laptop at the kitchen table and pack it away each evening. Don’t buy a chair yet — buy a laptop riser, an external keyboard, and a mouse. That trio converts any table into a roughly correct workstation for a fraction of the cost of a desk, and it stores in a drawer. It’s the highest-value change in this whole guide.
The full-day desk dweller
You’re at a proper desk six to eight hours a day. Your leverage points are the chair (make sure your lower back is genuinely supported), a second monitor positioned at eye level, and break discipline — the setup is probably fine, but the stillness isn’t. Document holders or a raised secondary screen also stop the constant downward glance at a paper or a phone.
The couch worker
Couches are anatomically hostile: low, soft, no back support, and they put the screen in your lap. I’m not going to pretend I never do it, but treat it as a reading posture, not a working one. If it happens daily, the honest fix is a lap desk plus a footrest as a stopgap — or better, claiming even a small table corner as the actual workstation.
The small-space worker
No room for a dedicated office? The geometry rules don’t change, they just get more portable. A compact riser, a folding external keyboard, and a dining chair with a firm cushion and a rolled towel for lumbar support can get you 80 percent of the way. Prioritize the monitor height and seat height; they do the most work per square foot.
Common Mistakes
Laptop at eye level, hands at the wrong height
Raising the laptop solves the neck problem and creates the shoulder problem: the keyboard is now too high. The correct answer is always riser plus external keyboard and mouse, one without the other.
Buying the chair before fixing the geometry
An expensive chair positioned badly is still a bad setup. Get the seat height, monitor height, and elbow angle right first; then a chair upgrade actually has something to work with.
Fixed desks treated as unfixable
If your desk is too tall, raise your chair and use a footrest; if it’s too low, raise the whole surface or get a keyboard tray. Desk height isn’t destiny, and the ideal desk height follows the same elbow-angle rule whether the desk is adjustable or not — measure your own elbow angle, don’t trust the sticker on a furniture listing.
Monitor too far, too low, or offset
A monitor pushed to the back corner of an L-shaped desk forces a rotated neck for hours. Center the screen on your body, not the desk. And if you’re leaning forward to read text, the solution is scaling or font size, not a hunch.
Wrist rest as a crutch
Padded rests are for pausing, not for resting on while you type, which compresses the underside of the wrists. Straight wrists while typing, rest only between bursts.
Skipping breaks because focus is good
Deep-work sessions are where stillness damage accumulates fastest. Guard the hourly micro-pause; your posture collapses exactly when your attention is most locked in.
Tools and Next Steps
You don’t need much to make this real, and most of the list is cheap or free:
- A laptop riser or monitor arm — the single biggest postural win for laptop-first remote workers.
- An external keyboard and mouse — required the moment the screen goes on a riser. Choose the mouse by hand size and grip, and read the best mouse for work breakdown before buying.
- A footrest — for shorter workers or taller desks; a box works fine.
- A timer you won’t hate — any hourly stand reminder beats none.
- A chair that fits, when the budget allows — at current list prices, quality ergonomic chairs run from a few hundred dollars to over $1,000 (Herman Miller’s Sayl starts under $1,000 and the Aeron runs above that). Fit matters more than brand: adjustable seat height, real lumbar support, and a seat depth that leaves a small gap behind your knees.
If your setup still feels wrong after all of the above, the problem is usually one measurement — desk height, seat height, or monitor height — and it’s worth checking our desk-height guide when it’s published, since a single centimeter-level fix often resolves what

The honest CTA: don’t buy anything today. Do the six-step sequence above with what you own, and only open your wallet for the item that measurably failed.
Frequently Asked Questions
How do I set up an ergonomic home office?
Start with the seat: feet flat, thighs parallel to the floor, lower back supported by the backrest. Set your screen so the top is at or slightly below eye level, about arm’s length away. Place keyboard and mouse so your elbows bend at 90 degrees with wrists straight. Control glare from windows, and take a short movement break every hour. If you’re on a laptop, a riser plus external keyboard converts almost any table into a workable setup.
What is the proper desk height for a home office?
Desk height isn’t a number — it’s an elbow angle. With your seat height set so your feet are flat and thighs level, your elbows should bend at roughly 90 degrees with forearms parallel to the floor when your hands are on the keyboard. If your desk is too tall, raise your chair and add a footrest; if it’s too low, raise the surface or use a keyboard tray. Adjust the chair first, the desk second, and verify with your own body, not a spec sheet.
Do I need to spend a lot of money on an ergonomic setup?
No. The highest-impact items — a laptop riser, external keyboard, and mouse — typically cost under $100 combined, and glare control and break habits cost nothing. Chairs are the expensive exception, and they’re worth it only after the geometry is correct; at current list prices, well-regarded ergonomic chairs range from a few hundred dollars to over $1,000. Fix positioning first, then spend on the one component still failing you.